IMAP Email Integration Settings
What is Email Integration?
Email Integration allows you to connect your Guest Support ticket system to your email inbox, automating the process of handling support emails. Once configured, the system will regularly check your inbox for new emails and replies, ensuring seamless ticket management.
- New Emails: When a user sends an email to your configured support email address, the system will automatically:
- Create a new ticket in the system.
- Send a notification email to both the user and the assigned Support agent.
- Replies to Tickets: If a user or the assigned Support agent replies to their ticket via email, the system will:
- Fetch the reply from your inbox.
- Add it as a response to the related ticket in the system.
- Send a notification email to the user if the reply is from the Support agent, or to the assigned Support agent if the reply is from the user.
With Email Integration, you can provide seamless support by managing both ticket and email interactions in one place. Automatically create tickets for new emails and update tickets with email replies, ensuring every interaction is logged and tracked within your Guest Support ticket system.
Server Requirements:
- PHP version: Ensure the server is running PHP 7.4 or later.
- Required PHP Extensions:
- imap: Must be installed and enabled for connecting to the IMAP server.
- mbstring: Ensures proper handling of email character encodings.
- openssl: Required for secure connections (e.g., SSL/TLS).
Email Address Configuration:
- Dedicated Email Address:
- Use a dedicated email address exclusively for this integration.
- Guidelines for Usage:
- Do not manually read or reply to emails sent to this address.
- Avoid using this address for support agents or general correspondence.
- Emails in this inbox will be managed automatically by Guest Support.
- Mailbox Requirements:
- IMAP must be enabled for the email account.
- The email provider should support SSL or TLS for secure connections.
- Access Credentials:
- Provide the following for configuration:
- IMAP server hostname (e.g., imap.example.com).
- Port number (e.g., 993 for SSL, 143 for TLS).
- Username (email address).
- Password. (Use a strong password for the email account.)
- Provide the following for configuration:
System Settings:
- Ensure the server's firewall allows outbound connections to the IMAP server.
- Increase PHP script execution time if necessary to handle large mailboxes:
max_execution_time: Set to at least 300 seconds.
- Memory limit:
memory_limit: At least 128M to handle processing emails with attachments.
To enable Email Integration:
- Login to Joomla! Administrator
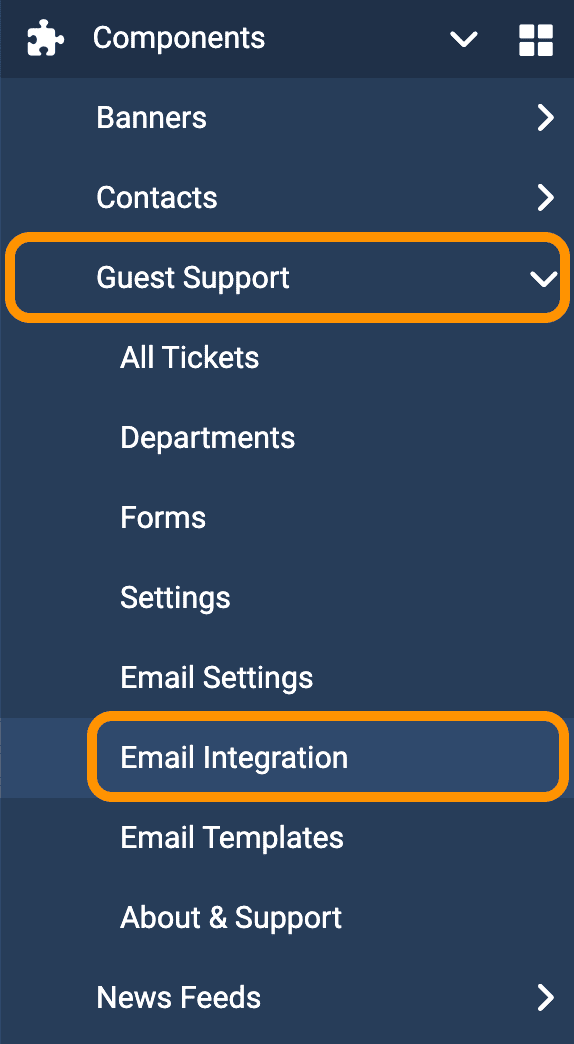
- Click on Components -> Guest Support -> Email Integration

- Follow on-screen instructions and update settings as you need.
- Click on Save & Close to save settings.
Setting Up Cron Job:
To ensure the IMAP email integration system functions automatically, setting up a cron job is required. The cron job will handle fetching emails and processing them without manual intervention.
- Cron job setup is different on different hosting control panel. Ask your hosting provider or refer to their documentation and learn how to create cron job on your hosting control panel
- Cron Command: curl -s "https://YOUR_DOMAIN/index.php?option=com_guestsupport&task=cron.emailtickethandler" > /dev/null
- Common/Time settings: Every 5 minutes.
Here is how to create Cron Job in cPanel:
- Login to your cPanel
- Search for Cron Jobs and then click on Cron Jobs

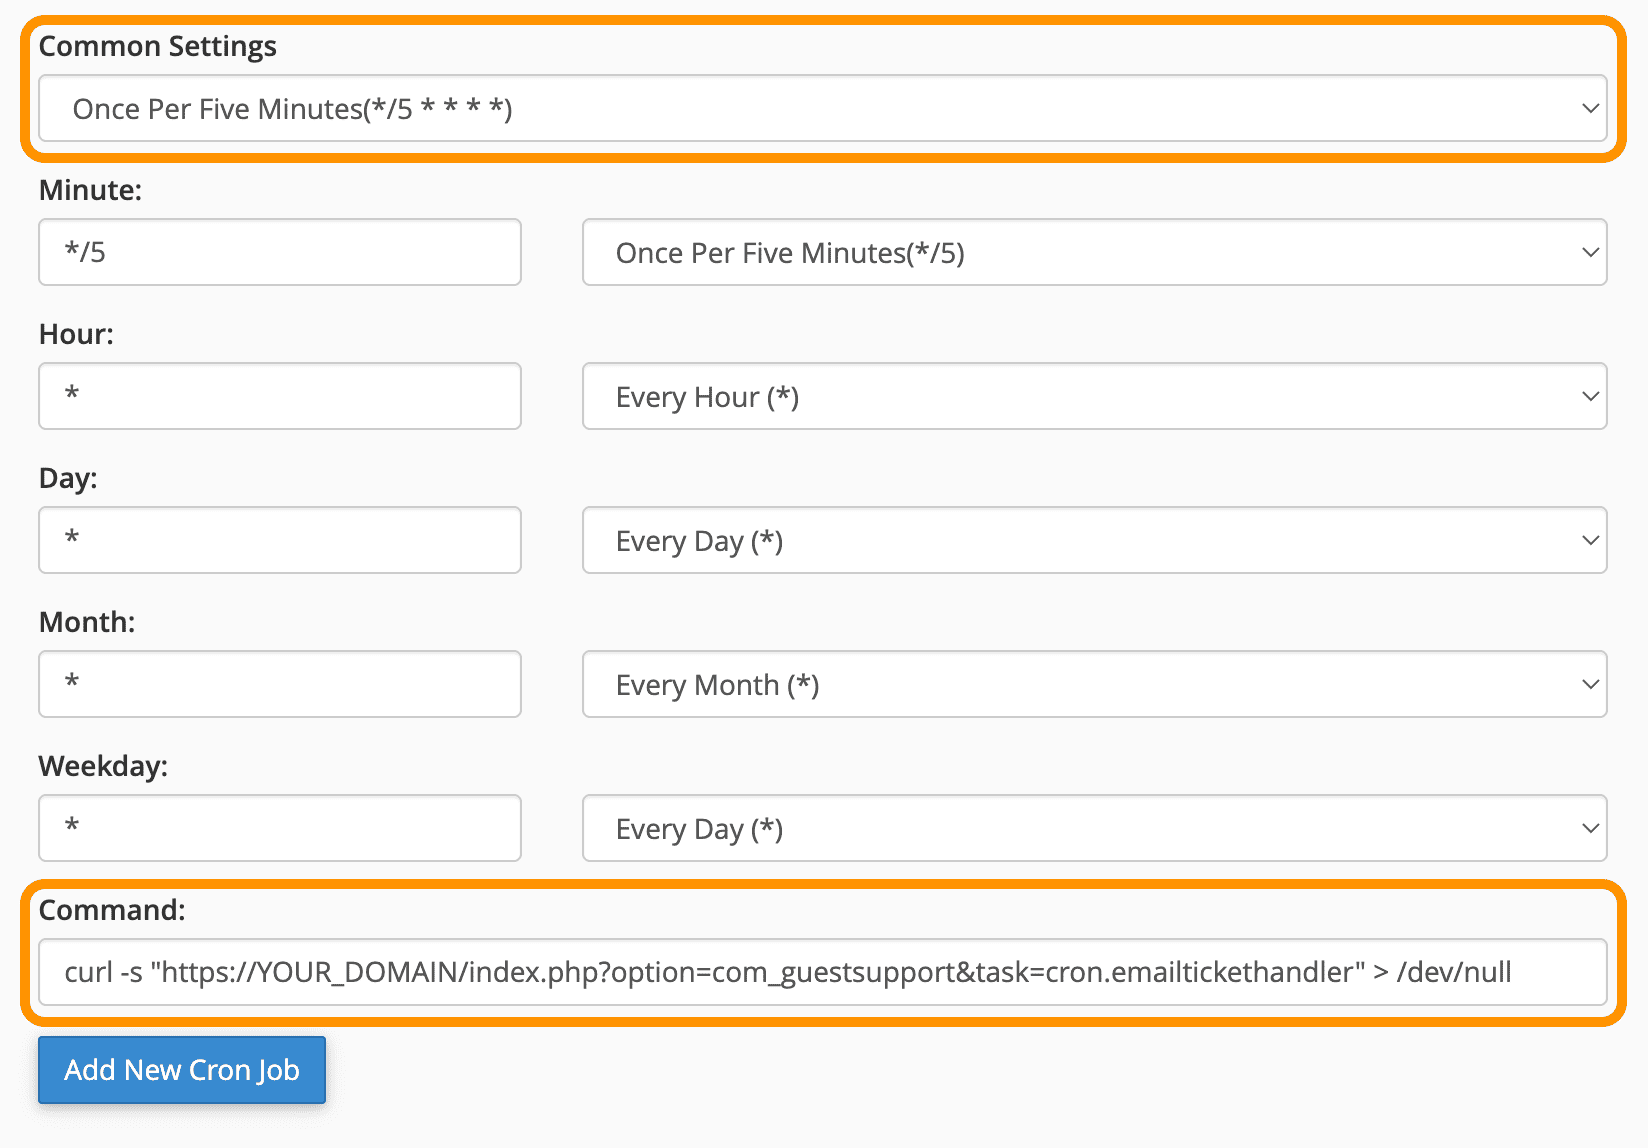
- Scroll down to Add New Cron Job
- Under Common Settings select Once Per Five Minutes(*/5 * * * *)
- Under Command: add-
curl -s "https://YOUR_DOMAIN/index.php?option=com_guestsupport&task=cron.emailtickethandler" > /dev/null
(replace YOUR_DOMAIN with your actual domain name.)
- Click on Add New Cron Job button.
